

Items needed:
6 red packets (ang pau)
Scissors
Stapler
Glue
A pair of googly eyes (optional)
6 red packets (ang pau)
Scissors
Stapler
Glue
A pair of googly eyes (optional)
To make the tail:
Step 1
Seal up all 6 red packets
Seal up all 6 red packets

Step 2
Fold the red packet into half, to get the crease line.(Mountain fold on the side where the ang pau has picture) Turn it over (back of the ang pau where there is no picture) and fold the corners to meet the center line.


Step 3
Fold the red packet into half again following the crease line which was made in Step 2.

Step 4
Fold one side of the red packet into half. (Valley fold on the side where the ang pau has picture)Turn over and do the same for the other side.
Fold one side of the red packet into half. (Valley fold on the side where the ang pau has picture)Turn over and do the same for the other side.


You have completed one piece of the tail. Make two more following Step 1 - Step 4.


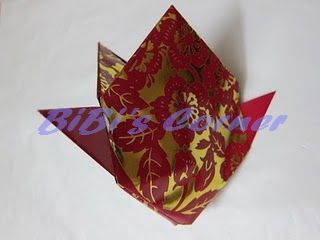
To join the individual tail together, use a stapler. Make sure you stapler at the end other end of the red packet.

Then fold out the tail like a fan while holding the other end of the tail. Apply glue at the end to secure the shape of the fish tail.

To make the body:
Step 1
Make a slight point on the red packet by folding it into half. Then fold the corners of the red packet to meet the point (similar to making the tail in Step 2). Notice that the only difference here is that there is no center crease line.


Step 2
We want to make the fish body smaller than the tail. So we have to cut the red packet. The amount to cut is judgemental.

Step 3
Make a light centre point on the red packet, on the other side where you have cut. Leave some space in between the center line when you fold the corners of the red packet to meet the point. This is for the fish's mouth.


You have completed one piece of the body. Make two more following Step 1 - Step 3.

To join the individual pieces together, use a stapler. Fix all three pieces together. Then turn it over.


To make the fins:
Take the leftover ang pau which was cut out earlier, cut into triangles to use as fins for the goldfish. Cut out three fins.

Fix the fins on three sides of the goldfish using a stapler.


(Side view)
Seal up the tail end of the fish using a stapler leaving some space to fix the tail.

(Side view)

(Back view)
Put some glue at both sides of the ready made fish tail to ensure that the tail does not move around. Fix the tail into the back of the fish. After fixing the tail, close up the holes using the stapler. Make sure when fixing the tail, the fish is facing correctly.


If you do not have googly eyes, you can draw a pair of eyes on a white piece of paper, cut it out and stick it onto the fish.
You have completed making the goldfish!!! You can stick it onto the wall, hang it or just leave it on a tabletop as decoration.


(Side view)
No comments:
Post a Comment